So you’ve got a Husky caulk gun and you’re ready to tackle that home project.



DISCLOSURE: https://caulk.io/ is supported by you the reader so if you buy any products featured on this site I may earn an affiliate commission. As an Amazon Associate I earn from qualifying purchases
First off, congrats on your choice—this trusty tool can be your best friend or your worst enemy, depending on how you wield it.



Don’t worry, though; with a little guidance, you’ll be a caulking pro in no time.
In this article, you’ll learn how to:
- Load your caulk like a boss
- Master the art of caulk application without turning your living room into a sticky disaster
- Clean up like a champ and avoid those “oops” moments
DISCLOSURE: https://caulk.io/ is supported by you the reader so if you buy any products featured on this site I may earn an affiliate commission. As an Amazon Associate I earn from qualifying purchases. Read my full disclosure here.



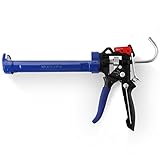


Overview of Husky Caulk Gun
Husky caulk guns pack a punch in both performance and accessibility.
Designed for DIY enthusiasts and professionals alike, these tools make sealing gaps feel like a walk in the park—well, minus the mosquitoes.
An average caulk gun can squeeze out about 6-8 ounces of caulk per minute. That’s a lot of sealing power!
This model features an ergonomic handle, ensuring you won’t turn into a T-Rex while using it.
The pressure-release mechanism prevents awkward caulk explosions, because nobody wants to wear caulk as their new accessory.
When it comes to size, Husky offers standard and compact options. Standard guns handle most cartridges, while compact versions fit snugly in tight spaces.
Choose wisely, as the right size can save you from a sore back or awkward contortions.
Preparing for Use
Prep work makes or breaks your caulking experience. Getting set up properly leads to a smoother application and fewer messes. Let’s dive into what you need.
Choosing the Right Caulk
Select the right caulk for your project. Different types exist for tasks like sealing windows, doors, and even bathtubs.
For instance, silicone caulk works wonders for wet areas while latex is easy to clean up.
Did you know some caulks cure faster than others? For example, some flexible caulks might dry in as little as 30 minutes, while others can take up to 24 hours (source: This Old House).
Check that you’re picking caulk suited for the surface and environment you’re tackling.
Step-by-Step Instructions
Ready to tackle caulking like a pro? Grab your Husky caulk gun, and let’s dive into these essential steps!
Loading the Caulk
First, pick your caulk. Make sure it’s the right type for your project. Next, remove the cap from the caulk tube.
Cut the nozzle at a 45-degree angle; precise cuts equal precise caulking.
Insert the tube into the caulk gun and push the plunger until it clicks. Voilà! You’re primed for action.
Applying the Caulk
Start in one corner and apply steady pressure on the trigger. Move the gun along the seam, keeping a consistent speed.
Too fast? You’ll have gaps. Too slow? You’ll create a caulk blob bigger than your pet goldfish.
Smooth the caulk with your finger or a caulking tool for a neat finish.
Remember, perfect caulking is like a strong relationship: it needs to be smooth and reliable!
Tips for Effective Caulking
Caulking can be a breeze, or it can leave you in a sticky situation. Here are some quick tips to keep it smooth and easy.
Common Mistakes to Avoid
- Skipping Surface Prep: Clean doesn’t just mean tidy. Dirt and dust can ruin your seal. Clean surfaces keep caulk sticking like a pro at a party.
- Overapplying Caulk: More isn’t always better. A messy caulk line equals extra cleanup. Stick to the recommended bead size, typically about the width of a pencil.
- Using the Wrong Caulk: Not all caulks are created equal. For wet areas, grab silicone. For indoor walls, latex is your friend. Ignoring this can be like wearing flip-flops in a snowstorm.
- Not Timing It Right: Some caulks cure within 30 minutes, while others take up to 24 hours. You’ll want to plan your project accordingly and not start a water balloon fight right after applying caulk.
Maintenance of Caulk Gun
- Clean After Use: Don’t leave dried caulk on the nozzle. Clean it right away, or you’ll turn your caulk gun into a sticky relic. A bit of solvent and a rag will do the trick.
- Check the Plunger: Ensure that the plunger moves smoothly. If it’s stuck, your caulking will face an uphill battle. No one wants a rebel plunger in their caulk gun.
- Store Properly: Keep your caulk gun in a cool, dry place. Leaving it exposed to the elements can warp parts and ruin your future projects. It’s got a tough life; it deserves a comfy home.
- Regular Inspections: Check your caulk gun for any damage before starting a new project. A well-maintained gun prevents problems and boosts your caulking confidence.
Conclusion
Now that you’re armed with all this caulking wisdom you’re ready to tackle those home projects like a pro. Just remember to load your
Husky caulk gun like a boss and apply that caulk with the precision of a surgeon.
Don’t forget to keep your finger steady and your expectations high. If you mess up just blame it on the caulk—it’s always the caulk’s fault right?
With your newfound skills you’ll be sealing gaps and cracks like a seasoned DIY warrior.
So go forth and caulk with confidence just don’t forget to clean up afterward or you might find yourself in a sticky situation. Happy caulking!
Last update on 2026-08-20 / Affiliate links / Images from Amazon Product Advertising API